


Z Axis Maintenance Items
|
Maintenance Items |
Frequency / Timing |
Core Operations and Objectives |
Required Tools / Materials |
|---|---|---|---|
|
Cleaning of Z-axis Guide Rails and Lead Screws |
Once a week or after streaks appear on the printout |
Remove dust and possible resin drips to prevent wear and jamming. |
Lint-free cloth and air blower. |
|
Platform Leveling Check |
Weekly or print the build plate and check for warping |
Ensure that the platform is completely parallel and tightly attached to the printing screen to guarantee uniform adhesion of the first layer. |
Leveling paper (A4 paper), hex key wrench. |
|
Mechanical Structure Fastening Inspection |
weekly |
Inspect and tighten key screws of components such as the platform, lead screw, linear guide rail and linear slider to prevent precision loss caused by loosening. |
A hex key of the corresponding size. |
|
Lubrication of Z-axis lead screw and guide rail |
weekly |
Apply dedicated supplementary grease to reduce friction and wear, ensuring smooth and quiet operation. |
Mechanical guide rail grease |
|
Motor and Coupler Inspection |
every three months |
Check whether the coupling is loose, and whether the motor has abnormal noise or overheating during operation. |
Hexagonal socket screwdriver, flashlight. |
Precautions for Daily Use Preventive Measures
Leveling Operation
1. Tool Preparation: Hex screwdriver, leveling card or a standard A4 sheet of paper, and a clean build platform.
2. Preliminary Preparation: Remove the build plate and loosen the leveling screws.
3. Place the leveling card: Place the prepared A4 paper or leveling card flat in the central area of the LCD printing screen.
4. Leveling Operation: Tap the "Leveling" option on the touchscreen of the printer, and the Z-axis will drive the build platform down to the preset leveling start position. Mount the build platform onto the cantilever of the printer's Z-axis, then lock the build platform to ensure it is fixed firmly without falling off or wobbling. At this point, the bottom surface of the platform will be pressed tightly against the leveling card under the effect of gravity.
5. Fixed Forming Platform: Spread the five fingers of one hand flat on the forming platform, apply uniform force downward, and hold the main body of the forming platform firmly to eliminate its free shaking. With the other hand, hold the Allen wrench, and in the order of diagonals, gradually tighten all the locking screws on both sides of the platform step by step. This sequence ensures even pressure distribution and prevents the platform from shifting due to one-sided locking.
6. Leveling Check: Try to pull the leveling card or A4 paper from different directions. The correct state is that you can feel uniform and moderate friction (with obvious resistance). If when pulling in a certain direction, you feel that the paper at a certain point can be easily pulled out without any resistance, it indicates that the gap of the platform on this side is too large, and the entire leveling process must be re-executed.
7. Recheck the leveling: After tightening, click "Zero" on the printer menu to lift the Z-axis. Place a long strip of paper at each of the four corners of the printing screen. Click "Leveling" to lower the Z-axis to the leveling position, then pull the paper at each corner one by one. The correct state is: feeling uniform and moderate friction (with obvious resistance). If the paper at a certain position can be easily pulled out without any resistance, it indicates that the platform gap on that side is too large, and the entire leveling process must be re-executed.
Precautions During the Printing Process
1. During the printing process, please check whether there are any obstacles in the movement range of the Z-axis that may interfere with its operation, and do not forcibly intervene in the up-and-down movement of the Z-axis manually.
Environment and Storage
1. Dust prevention: When the printer is not in use for a long time, close its dust cover to reduce dust from entering the Z-axis system.
2. Stable Placement: Ensure the printer is placed on a perfectly horizontal and stable desktop to avoid additional stress on the Z-axis caused by machine shaking.
3. Storage Requirements: It is recommended that the storage temperature of the equipment be within 0°C to 45°C, the optimal temperature is around 25°C, and the humidity shall not exceed 60%.
4. Working Environment Requirements: It is recommended to place the product in a cool, well-ventilated indoor area, isolated from living quarters and offices, and avoid placing it in locations exposed to direct sunlight.
Periodic Maintenance Procedures
Cleaning operations weekly or as needed
1. Visual Inspection: Use a flashlight to check the surfaces of the Z-axis lead screw and guide rail for obvious resin blocks, accumulated dust clumps, and blackened grease. Inspect the bottom of the coupling for any visible debris.
2. Dry cleaning:
1. Use an air gun to blow away large particles of dust.
2. Click "Leveling" to lower the Z-axis to the lowest point. At the lead screw position above the cantilever, use a dry lint-free cloth to tightly wrap the lead screw, then click "Zero" to move the Z-axis upward, and the lint-free cloth will clean the lead screw along its thread direction. Never spray liquid cleaner directly.
3. Inspection: Manually rotate the motor coupling slowly and check for any laggy spots.
Lubrication operation after each cleaning
Warning: Excessive lubrication is more harmful than insufficient lubrication, as it easily attracts dust and forms an abrasive paste.
1. Cleaning: Thoroughly clean the lead screw first according to the steps above.
2. Grease Selection: Use mechanical guideway grease (typically white synthetic lithium-based grease). Do not use liquid lubricants such as WD-40 or butter.
3. Application: Apply an appropriate amount of grease to the threads of the lead screw. A small amount of grease can be dabbed on the upper and lower ends of the lead screw.
4. Distribution: Control the Z-axis movement via the printer to make the platform run slowly up and down for 5-10 full cycles throughout the process to evenly distribute the grease.
5. Clean up overflow: Wipe off the excess grease that has been squeezed out with a dry lint-free cloth.
Mechanical Inspection and Tightening
1. Check whether all the locking screws of the platform, lead screw, linear guide, linear slider and other components are tightened.
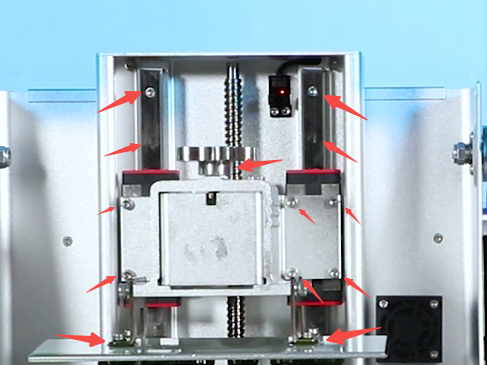
Z-axis fasteners and inspection points
2. Check whether the set screws fastening the coupling between the motor and the lead screw are loose.
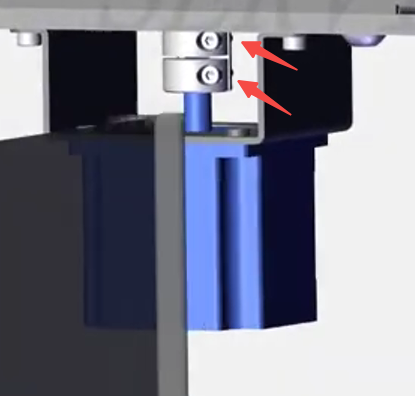
Motor coupling set screws
Troubleshooting and Diagnosis of Common Faults
If the following issues occur, you can follow this process to initially troubleshoot the causes related to the Z-axis:
|
Fault Phenomenon |
Possible Causes |
Troubleshooting and Resolution Steps |
|---|---|---|
|
Print non-stick plates or warped plates |
1. The platform is in a poor leveling condition. |
1. Re-leveling. |
|
The model has regular lamellar striations(Occurs at a fixed Z height) |
1. There is dirt interference at a certain point on the Z-axis lead screw. |
1. Clean the entire lead screw and check for any dirt or contamination. |
|
Abnormal noise during Z-axis operation(friction, creaking sound) |
1. Insufficient lubrication or dry-out. |
1. Re-lubricate after cleaning. |
Manual Implementation Record
It is recommended that users create a simple maintenance log to record the dates of each cleaning, lubrication and leveling, as well as the observed conditions, so as to facilitate problem tracking and prevention.